-40%
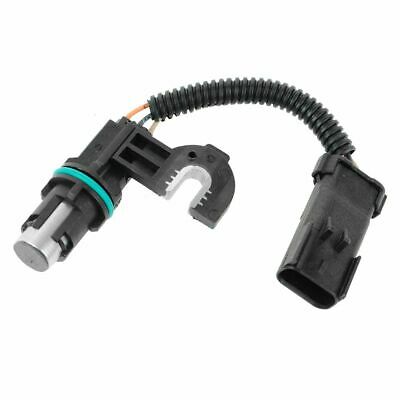
Camshaft Position Sensor For Audi TT Quattro 02-07 Volkswagen Golf R 2007-2013
$ 9.95
- Description
- Size Guide
Description
Features:Super fast handling time.
Check the connection in the pictures.
Built to strict quality control standards.
100% tested for reliability and performance.
Fast & Free USPS Shipping.
Top performance for long service life.
Fit and Quality Guaranteed.
Ensures product service, quality, and long-lasting durability.
Brand New Manufactured with New Premium Quality Components.
Heavy duty.
Maximum reliability.
Notice:
* Professional installation is recommended (No Instruction Included)
* For any needs please contact us
Item Details:
Camshaft Position Sensor For Audi TT Quattro 02-07 Volkswagen Golf R 2007-2013
Features:
Super fast handling time.
Check the connection in the pictures.
Built to strict quality control standards.
100% tested for reliability and performance.
Fast & Free USPS Shipping.
Top performance for long service life.
Fit and Quality Guaranteed.
Ensures product service, quality, and long-lasting durability.
Brand New Manufactured with New Premium Quality Components.
Heavy duty.
Maximum reliability.
Notice:
* Professional installation is recommended (No Instruction Included)
* For any needs please contact us
Item Details:
Connector Gender:Female
Terminal Gender:Male
Terminal Type:Blade
Connector Shape:Rectangular
Connector Quantity:1
Fitment Type:Direct Replacement
Waranty:1 year
Interchange Part Number:
PC670 5S1411 SU6533
Fit For:
(For reference only, it may fit a lot of more models, please check your part number beFore purchasing.)
Audi A3 2.0L 1984CC 121Cu. In. l4 GAS DOHC 2006-2007
Audi A3 2.0L 1984CC 121Cu. In. l4 GAS DOHC 2006-2007
Audi A4 2.0L 1984CC 121Cu. In. l4 GAS DOHC 2007-2009
Audi A4 3.0L 2976CC V6 GAS DOHC 2002-2005
Audi A4 Quattro 2.0L 1984CC 121Cu. In. l4 GAS DOHC 2009
Audi A4 Quattro 3.0L 2976CC V6 GAS DOHC 2002-2006
Audi A6 3.0L 2976CC V6 GAS DOHC 2002-2004
Audi A6 3.0L 2950CC V6 GAS DOHC 2002-2004
Audi A6 Quattro 3.0L 2950CC V6 GAS DOHC 2002-2004
Audi A6 Quattro 3.0L 2976CC V6 GAS DOHC 2002-2004
Audi Allroad Quattro 4.2L 4172CC V8 GAS DOHC 2003-2005
Volkswagen Eos 2.0L 1984CC 121Cu. In. l4 GAS DOHC 2007-2010
Volkswagen GTI 2.0L 1984CC 121Cu. In. l4 GAS DOHC 2006-2008
Volkswagen Golf 2.0L 1984CC 121Cu. In. l4 GAS DOHC 2012-2013
Volkswagen Golf City 2.0L 1984CC 121Cu. In. l4 GAS SOHC 2007
Volkswagen Jetta 2.0L 1984CC 121Cu. In. l4 GAS DOHC 2006-2008
Volkswagen Jetta 2.0L 1984CC 121Cu. In. l4 GAS SOHC 2006-2008
Volkswagen Jetta City 2.0L 1984CC 121Cu. In. l4 GAS SOHC 2007
Seat Leon 2.0L 1984CC 121Cu. In. l4 GAS DOHC 2008-2011
Seat Leon 2.0L 1984CC 121Cu. In. l4 GAS DOHC 2007
Volkswagen Passat 2.0L 1984CC 121Cu. In. l4 GAS DOHC 2006-2007
Audi S3 1.8L 1781CC l4 GAS DOHC 2004
Audi S4 4.2L 4163CC V8 GAS DOHC 2004-2009
Audi S6 4.2L 4172CC V8 GAS DOHC 2004
Audi TT Quattro 2.0L 1984CC 121Cu. In. l4 GAS DOHC 2009-2014
Package Included:
1 X Camshaft Position Sensor
How to Replace Crankshaft Position Sensor
1. Disconnect the Battery
Anytime you are working with the inner workings of the engine its a good idea to disconnect the battery to avoid a short circuit to the car's electrical system. For hybrid vehicles also remove the disarm plug for the main battery pack. Check your owner's manual for the location.
2. Clear Access to the Sensor
This particular crank sensor is behind the starter motor which must be removed to gain access to the sensor.
3. Inspect the Sensor Location
This sensor is a little tough to see because of the transmission cooling lines but is it in the side of the block with the electrical connector attached. If the crankshaft angle sensor is oily now is a good time to use a small amount of carburetor cleaner to remove the oil to get a clean start on the job.
4. Release the Electrical Connector
An electrical connector will be held to the sensor using a plastic clip which you much push down or pull outward to release. Once this is done gentle wiggle the connector loose from the sensor. Sometimes this connector can be a little stuck due to the weather pack seal which helps keep water out which will cause corrosion at the sensor terminals. Once the connector is removed check it for rust and clean or replace the pigtail if needed. This problem alone will cause the engine to stall.
5. Remove the Sensor Mount Bolt
Most crankshaft sensors will have just one mount bolt which will typically be a 10mm bolt. Use a small wrench or socket to remove the bolt by turning it counterclockwise and place to the side for safe keeping.
6. Remove the Sensor
Removing the crank sensor can be a little difficult because they have a long stem and can get stuck in the block. Use a small pick or standard screwdriver to wedge under the sensor mounting tab to pry it loose. Be careful not to apply to much pressure because these sensors have been known to break leaving a part of the sensor inside the block. When this happens sometimes you will have the option of pushing the broken piece inward so it falls into the oil pan where it will stay or you can remove the oil pan to remove the broken piece.Once the sensor is loose firmly grasp it and with a twisting motion pull it from the engine block. There will be a sealing O ring on the sensor with will need to be replaced with the new sensor. Most new sensors come with a new O ring.
7. Match the New Crankshaft Sensor
Wipe off any oil the old sensor has on it so you can clearly see any design changes the new sensor might have. Slight design changes are common when installing new sensors such as mounting tabs. One thing that can be different is the length of the sensor stem because if the stem is too long it will contact the crankshaft and if it is too short it will not read correctly.
8. Installing the New Crank Position Sensor
Before installing the new sensor use a shop towel to clean the position sensor port hole to ensure a proper seal to the new sensor O ring. Motor oil will be present at this port so do not spray carburetor cleaner inside the port. You can spray cleaner on the shop towel to aid the cleaning process.
Position the new crank sensor squarely into the sensor port hole and firmly push it into place while aligning the mounting plate hole to the threaded bolt hole in the block. Then insert the mounting bolt and thread it in by hand by turning it clockwise to avoid cross threading. Use a small amount of clean engine oil or WD40 to lubricate the O ring seal to avoid damage to the seal which will cause an oil leak. After the sensor has been installed thread the mounting bolt into place and tighten to about 2-3 foot pounds.
Push the electrical connector into place while listening for a click telling you the connector is successfully installed and ready for operation.
9. Reconnect the Battery
Remove the car off of the jack stands and reconnect negative battery cable.
Item Specifics
Brand
A-Carparts
Manufacturer Part Number
A10277901C
Package Width
2.25 inch
Fitment Type
Direct Replacement
Package Length
3 inch
Custom Bundle
No
Package Height
1.78 inch
Pins Account
As Picture Shows
Warranty
1 Year
Connector Shape
Oblong
Connector Type
Plug In
OE/OEM Part Number
06C905163B
Other Part Number
PC670 5S1411 SU6533
OE Spec or Performance/Custom
OE Spec
Performance Part
Yes
System
Sensor System
Modified Item
No
Switch Type
Engine Camshaft Position Sensor
Note
No Instruction Included
Packaging
New in Box
Mounting Bracket Included
No
Non-Domestic Product
No
Terminal Quantity
3
Universal Fitment
No
Color
Black(as pictures show)
Package Content
1pc
Notice
For remote areas, You need pay the additional shipping charge
Interchange Part Number
06C905163B
Mount Hole Quantity
1
Finish
Premium Product Quality
Grade Type
Regular
Type
Camshaft
Connector Quantity
1
Items Included
1pcs camshaft position sensor
Interchange Part Number
7L6521102;7L0521102B
Payment
Payment should be completed within 4 (Four) days of auction closing. Or unpaid dispute will be filed for closing auction.
We will leave a positive feedback immediately after payment is received. We appreciate a positive feedback as much as you do. If for some reason there is any issue with the purchase, please contact us prior to leaving feedback, we will be glad to work together and provide a satisfying solution.
Warranty
This item comes with 12 months Warranty from the date of customers purchased it. Special circumstances will be listed clearly in the listing.
If your item has been damaged in transit or become faulty in warranty period, please email us with pictures or video to show the problem.
Please do check everything carefully after you received the parcel, any the damage except DOA (Dead-On-Arrival) would not be covered if it's your fault.
Replacement products are provided with the same warranty as the returned products.
Returns
Our return policy is straightforward and customer friendly. You can shop with us. As long as it is within the limits of the manufacturer's warranty return policy (which we are obliged to comply with) and meet the following conditions, we will take back any goods within 30 days after purchase:
1.The article must be in its original, unused state and must be returned in its original packaging.
2.We cannot accept any items that have been installed and / or damaged. In addition, we do not accept returns that are not in the original packaging. These are restrictions set by product manufacturers and we are obliged to comply with their return policies. 3.Items returned substandard or missing parts will not be credited.
Contact
Our Working Time:(GMT+8)Monday to Friday,9:00-18:00.
For inquires and customer support, please send your email via ebay email system.
All emails will be responded to within 24 hours during business days.
If You are not sure about what exactly, You need feel free to contact Us every working day (except on weekend) and get professional assistance within 24 hours, in that way You will get the right part and do not need to deal with returns - save your time!
Parts Information: Before purchase this parts, please check the compatibility information or call your local dealer to verify the correct OEM part number.
About Us
Welcome to our eBay store. As a leading and emerging company in manufacturer and exporting business, we are specialized in Car parts and accessories products for more than 10 years. We believe that it is our vision and mission to provide innovative products with best service and competitive price to satisfy you. Our goal is to make sure that you can find exactly what you are looking for and make it easy for you to place your orders.
DESCRIPTION
PAYMENT
SHIPPING
RETURN POLICY
CONTACT US
Shop Category
Store Home
Engine Mount
Gauge
◈ Pressure Gauge
◈ Turbo Boost Gauge
◈ Oil Pressure Gauge
Sensor
Starter
Steering System
◈ Power Steering Rack
◈ Power Steering Pump & Parts
Drive shaft
Alternator
Oil Fuel Line
Transmission Filter
Transmission Kit
Car Floor Mats
Hot Item
For Chevy Traverse GMC Acadia 3.6L Engine Motor & Trans Mount Set 4PCS 2009-2015
USD 101.98
3Pcs Car Floor Liners Mats Set For 2015-2022 Ford F-150 Fits SuperCrew Cab Black
USD 75.24
Alternator For 1 Wire For Chevrolet GM BBC SBC 327-350-396-427-454 110Amp 12V
USD 91.25
Automatic Trans Engine Mount For 2009-2013 Toyota Corolla CE Sedan 4-door 1.8L
USD 89.54
Motor & Trans Mount 5Pcs Set For 2002-2006 Honda CRV 2.4L 4WD For Auto Trans
USD 69.21
Excellent Delivery
Help & Info
Payment Policy
Shipping Policy
Return Policy
FAQ
About Us
New List Item
Front Drive Shaft For Jeep Grand Cherokee 4.0L 1999 2000 2001 65-9313 52099497AC
USD 127.82
DriveShaft For 2002-2004 Jeep Liberty KJ 2.4L For Manual Transmission 52111596AA
USD 122.85
Starter Fits Honda Engine GX340 GX390 13hp Starter 2011 2013 GX 31210-ZE3-013
USD 39.56
Staretr Fits Yamaha Golf Carts G11AJ G2AD G14AM G2AB G2AM5 G5AF G8AH G9AG 113147
USD 130.98
Front Drive Shaft Fits 1999 2000-2004 Land Rover Discovery 4.0L 65-9271 938-510
USD 152.99
Camshaft Position Sensor For Audi TT Quattro 02-07 Volkswagen Golf R 2007-2013
Features:
Super fast handling time.
Check the connection in the pictures.
Built to strict quality control standards.
100% tested for reliability and performance.
Fast & Free USPS Shipping.
Top performance for long service life.
Fit and Quality Guaranteed.
Ensures product service, quality, and long-lasting durability.
Brand New Manufactured with New Premium Quality Components.
Heavy duty.
Maximum reliability.
Notice:
* Professional installation is recommended (No Instruction Included)
* For any needs please contact us
Item Details:
Connector Gender:Female
Terminal Gender:Male
Terminal Type:Blade
Connector Shape:Rectangular
Connector Quantity:1
Fitment Type:Direct Replacement
Waranty:1 year
Interchange Part Number:
PC670 5S1411 SU6533
Fit For:
(For reference only, it may fit a lot of more models, please check your part number beFore purchasing.)
Audi A3 2.0L 1984CC 121Cu. In. l4 GAS DOHC 2006-2007
Audi A3 2.0L 1984CC 121Cu. In. l4 GAS DOHC 2006-2007
Audi A4 2.0L 1984CC 121Cu. In. l4 GAS DOHC 2007-2009
Audi A4 3.0L 2976CC V6 GAS DOHC 2002-2005
Audi A4 Quattro 2.0L 1984CC 121Cu. In. l4 GAS DOHC 2009
Audi A4 Quattro 3.0L 2976CC V6 GAS DOHC 2002-2006
Audi A6 3.0L 2976CC V6 GAS DOHC 2002-2004
Audi A6 3.0L 2950CC V6 GAS DOHC 2002-2004
Audi A6 Quattro 3.0L 2950CC V6 GAS DOHC 2002-2004
Audi A6 Quattro 3.0L 2976CC V6 GAS DOHC 2002-2004
Audi Allroad Quattro 4.2L 4172CC V8 GAS DOHC 2003-2005
Volkswagen Eos 2.0L 1984CC 121Cu. In. l4 GAS DOHC 2007-2010
Volkswagen GTI 2.0L 1984CC 121Cu. In. l4 GAS DOHC 2006-2008
Volkswagen Golf 2.0L 1984CC 121Cu. In. l4 GAS DOHC 2012-2013
Volkswagen Golf City 2.0L 1984CC 121Cu. In. l4 GAS SOHC 2007
Volkswagen Jetta 2.0L 1984CC 121Cu. In. l4 GAS DOHC 2006-2008
Volkswagen Jetta 2.0L 1984CC 121Cu. In. l4 GAS SOHC 2006-2008
Volkswagen Jetta City 2.0L 1984CC 121Cu. In. l4 GAS SOHC 2007
Seat Leon 2.0L 1984CC 121Cu. In. l4 GAS DOHC 2008-2011
Seat Leon 2.0L 1984CC 121Cu. In. l4 GAS DOHC 2007
Volkswagen Passat 2.0L 1984CC 121Cu. In. l4 GAS DOHC 2006-2007
Audi S3 1.8L 1781CC l4 GAS DOHC 2004
Audi S4 4.2L 4163CC V8 GAS DOHC 2004-2009
Audi S6 4.2L 4172CC V8 GAS DOHC 2004
Audi TT Quattro 2.0L 1984CC 121Cu. In. l4 GAS DOHC 2009-2014
Package Included:
1 X Camshaft Position Sensor
How to Replace Crankshaft Position Sensor
1. Disconnect the Battery
Anytime you are working with the inner workings of the engine its a good idea to disconnect the battery to avoid a short circuit to the car's electrical system. For hybrid vehicles also remove the disarm plug for the main battery pack. Check your owner's manual for the location.
2. Clear Access to the Sensor
This particular crank sensor is behind the starter motor which must be removed to gain access to the sensor.
3. Inspect the Sensor Location
This sensor is a little tough to see because of the transmission cooling lines but is it in the side of the block with the electrical connector attached. If the crankshaft angle sensor is oily now is a good time to use a small amount of carburetor cleaner to remove the oil to get a clean start on the job.
4. Release the Electrical Connector
An electrical connector will be held to the sensor using a plastic clip which you much push down or pull outward to release. Once this is done gentle wiggle the connector loose from the sensor. Sometimes this connector can be a little stuck due to the weather pack seal which helps keep water out which will cause corrosion at the sensor terminals. Once the connector is removed check it for rust and clean or replace the pigtail if needed. This problem alone will cause the engine to stall.
5. Remove the Sensor Mount Bolt
Most crankshaft sensors will have just one mount bolt which will typically be a 10mm bolt. Use a small wrench or socket to remove the bolt by turning it counterclockwise and place to the side for safe keeping.
6. Remove the Sensor
Removing the crank sensor can be a little difficult because they have a long stem and can get stuck in the block. Use a small pick or standard screwdriver to wedge under the sensor mounting tab to pry it loose. Be careful not to apply to much pressure because these sensors have been known to break leaving a part of the sensor inside the block. When this happens sometimes you will have the option of pushing the broken piece inward so it falls into the oil pan where it will stay or you can remove the oil pan to remove the broken piece.Once the sensor is loose firmly grasp it and with a twisting motion pull it from the engine block. There will be a sealing O ring on the sensor with will need to be replaced with the new sensor. Most new sensors come with a new O ring.
7. Match the New Crankshaft Sensor
Wipe off any oil the old sensor has on it so you can clearly see any design changes the new sensor might have. Slight design changes are common when installing new sensors such as mounting tabs. One thing that can be different is the length of the sensor stem because if the stem is too long it will contact the crankshaft and if it is too short it will not read correctly.
8. Installing the New Crank Position Sensor
Before installing the new sensor use a shop towel to clean the position sensor port hole to ensure a proper seal to the new sensor O ring. Motor oil will be present at this port so do not spray carburetor cleaner inside the port. You can spray cleaner on the shop towel to aid the cleaning process.
Position the new crank sensor squarely into the sensor port hole and firmly push it into place while aligning the mounting plate hole to the threaded bolt hole in the block. Then insert the mounting bolt and thread it in by hand by turning it clockwise to avoid cross threading. Use a small amount of clean engine oil or WD40 to lubricate the O ring seal to avoid damage to the seal which will cause an oil leak. After the sensor has been installed thread the mounting bolt into place and tighten to about 2-3 foot pounds.
Push the electrical connector into place while listening for a click telling you the connector is successfully installed and ready for operation.
9. Reconnect the Battery
Remove the car off of the jack stands and reconnect negative battery cable.
Item Specifics
Brand :
A-Carparts
Manufacturer Part Number :
A10277901C
Package Width :
2.25 inch
Fitment Type :
Direct Replacement
Package Length :
3 inch
Custom Bundle :
No
Package Height :
1.78 inch
Pins Account :
As Picture Shows
Warranty :
1 Year
Connector Shape :
Oblong
Connector Type :
Plug In
OE/OEM Part Number :
06C905163B
Other Part Number :
PC670 5S1411 SU6533
OE Spec or Performance/Custom :
OE Spec
Performance Part :
Yes
System :
Sensor System
Modified Item :
No
Switch Type :
Engine Camshaft Position Sensor
Note :
No Instruction Included
Packaging :
New in Box
Mounting Bracket Included :
No
Non-Domestic Product :
No
Terminal Quantity :
3
Universal Fitment :
No
Color :
Black(as pictures show)
Package Content :
1pc
Notice :
For remote areas, You need pay the additional shipping charge
Interchange Part Number :
06C905163B
Mount Hole Quantity :
1
Finish :
Premium Product Quality
Grade Type :
Regular
Type :
Camshaft
Connector Quantity :
1
Items Included :
1pcs camshaft position sensor
Interchange Part Number :
7L6521102;7L0521102B
Payment
Warranty
Returns
Contact
About Us
Payment should be completed within 4 (Four) days of auction closing. Or unpaid dispute will be filed for closing auction.
We will leave a positive feedback immediately after payment is received. We appreciate a positive feedback as much as you do. If for some reason there is any issue with the purchase, please contact us prior to leaving feedback, we will be glad to work together and provide a satisfying solution.
This item comes with 12 months Warranty from the date of customers purchased it. Special circumstances will be listed clearly in the listing.
If your item has been damaged in transit or become faulty in warranty period, please email us with pictures or video to show the problem.
Please do check everything carefully after you received the parcel, any the damage except DOA (Dead-On-Arrival) would not be covered if it's your fault.
Replacement products are provided with the same warranty as the returned products.
Our return policy is straightforward and customer friendly. You can shop with us. As long as it is within the limits of the manufacturer's warranty return policy (which we are obliged to comply with) and meet the following conditions, we will take back any goods within 30 days after purchase:
1.The article must be in its original, unused state and must be returned in its original packaging.
2.We cannot accept any items that have been installed and / or damaged. In addition, we do not accept returns that are not in the original packaging. These are restrictions set by product manufacturers and we are obliged to comply with their return policies. 3.Items returned substandard or missing parts will not be credited.
Our Working Time:(GMT+8)Monday to Friday,9:00-18:00.
For inquires and customer support, please send your email via ebay email system.
All emails will be responded to within 24 hours during business days.
If You are not sure about what exactly, You need feel free to contact Us every working day (except on weekend) and get professional assistance within 24 hours, in that way You will get the right part and do not need to deal with returns - save your time!
Parts Information: Before purchase this parts, please check the compatibility information or call your local dealer to verify the correct OEM part number.
Welcome to our eBay store. As a leading and emerging company in manufacturer and exporting business, we are specialized in Car parts and accessories products for more than 10 years. We believe that it is our vision and mission to provide innovative products with best service and competitive price to satisfy you. Our goal is to make sure that you can find exactly what you are looking for and make it easy for you to place your orders.
All rights reserved.


